MESH 101 Mesh Education Directory
The Mesh Education Tutorial Directory is a practical Mesh LoRa radio user guide listing that includes a clear outline index, with links to step-by-step setup tips, and curated lists of official and instructional resources for Meshtastic users. (attribution links provided where available – see terms & conditions. Additional Mesh Community Tutorial Resource links are welcomed).
Meshtastic turns low-cost LoRa radios into an off-grid mesh network that can send messages without internet or cellular service. This guide walks you through choosing hardware, flashing firmware, configuring the device, and sending your first message. [See Getting Started With Meshtastic]
Meshtastic LoRa Radio User Guide
Syllabus Shortcuts: What you need | Hardware choice | Flashing firmware | Connecting and configuring | Troubleshooting | Common issues and fixes | Bluetooth and app issues | Firmware problems | How channels work | MQTT integration | MQTT Setup Guide | Self-hosted MQTT broker setup | Instructional videos | Community tutorials |
Outline Index Table of Contents
- What is a Mesh?
- What you need to get started.
- Choosing supported hardware.
- Safety checks before powering on.
- Flashing the firmware.
- Connecting your phone or computer.
- Basic configuration.
- Sending your first message.
- Roles, channels, and mesh behavior.
- Troubleshooting and next steps. [🛠 Advanced MQTT Integration ]
- Helpful articles and videos.
About Mesh Networks
What is a Mesh Network
A mesh network such as Meshtastic or MeshCore uses low-power, inexpensive LoRa (Long Range) radios to create a decentralized, off-grid communication network that operates without cellular service or internet. Nodes (devices) communicate directly with each other, automatically relaying messages for others to extend range, forming a mesh network that works up to 200 miles in ideal conditions.
What Meshtastic is
Meshtastic is an open-source project that turns inexpensive LoRa radios into a long-range, off-grid communication system. Devices rebroadcast messages to form a mesh network, so users can communicate without internet or cell service.
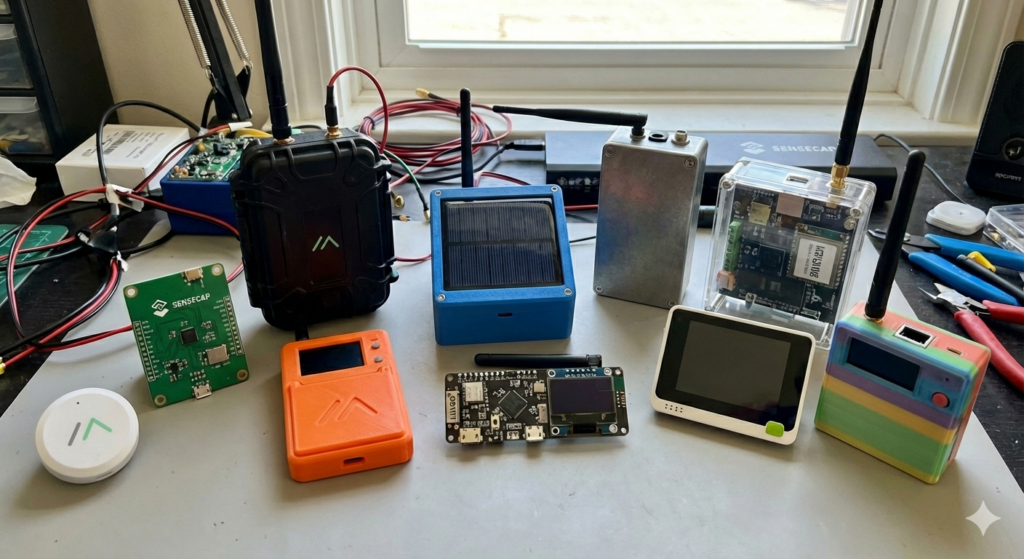
What you need
You need a compatible Meshtastic-capable radio, a good antenna, a data-capable USB cable if you plan to flash by cable, and the Meshtastic app or web interface for setup. Meshtastic supports phone, computer, Bluetooth, Wi-Fi, and USB connections depending on the hardware.
Hardware choice
Meshtastic’s official getting-started guide organizes hardware by chipset type, including ESP32, nRF52, and RP2040/RP2350 options. The official docs also note that some devices are partner hardware, some are backer hardware, and some are community supported.
A simple beginner setup is usually a prebuilt device with firmware already installed, while DIY users may prefer a board they can flash themselves. The best choice depends on whether you want easy setup, battery life, or more advanced customization.
WATCH: Beginner’s Buying Guide – YouTube | Meshtastic Getting Started
Safety before power
Do not power on the radio without an antenna attached, because that can damage the radio chip. Also verify that your USB cable can transfer data, since some cables only charge and will not work for flashing.
Flashing firmware
If your device is supported, follow the Meshtastic flashing instructions for your hardware type and use the official web flasher or device-specific flashing method. The official guide separates flashing paths for ESP32 and for nRF52/RP2040/RP2350 devices. Meshtastic Getting Started
For beginners, a video walkthrough of the web flasher or a step-by-step flashing guide is often the fastest way to get the first node online.youtube+1
Connecting and configuring
After flashing, connect the device to the Meshtastic app or client software using Bluetooth, Wi-Fi, or USB depending on your model. Then set your region, confirm the frequency plan, and complete initial device settings before joining the mesh.
WATCH: Meshtastic Beginners Guide: Easy Flashing & Setup Tutorial – YouTube
The official intro explains that each device can pair with one phone at a time, which is important when testing or sharing a radio.
First message
Once the device is connected and configured, join the primary channel and send a short test message to the mesh. If another Meshtastic node is nearby, the message should rebroadcast across the network.
A simple test message like “Test from Node 1” is enough to confirm basic operation. If it does not work, check the antenna, region setting, and whether the device is actually connected to the mesh.
WATCH: Meshtastic Beginners Guide: Best Devices, Easy Flashing & Setup Tutorial – YouTube:
Roles, channels and mesh behavior
Meshtastic radios work as clients, routers, repeaters, or sensor nodes depending on how they are configured and deployed. This is what makes the system useful for local groups, trail teams, off-grid communication, and emergency backup messaging.
The system is decentralized, so there does not need to be a single central router for everyone to talk. That makes it resilient, especially in areas without reliable infrastructure. Meshtastic Introduction | Mesh Etiquette | Mesh Education
Troubleshooting
If flashing fails, confirm the cable supports data, the device is in the correct flashing mode, and you selected the right firmware family. If messaging fails, verify antenna attachment, regional settings, and that the app is paired to the correct node.
WATCH: Getting Started with Meshtastic – Flashing & Configuration
If you are using community-supported hardware, the official docs recommend checking the community and Discord for help because not every board is officially supported.
Common Meshtastic setup problems usually come down to region settings, antenna issues, pairing problems, or firmware and version mismatches. The good news is that most of them are fixable with a quick checklist.
Meshunderground – Meshtastic Troubleshooting – Reliable Off-Grid Communication
Common issues and fixes –
| Issue | Likely cause | Fix |
|---|---|---|
| No nodes appear | Wrong region, weak signal, or poor placement | Confirm the correct region/frequency plan, move higher or closer, and test with another node. meshtastic+1 |
| Messages won’t send | Channel mismatch or wrong encryption/key settings | Make sure both devices are on the same channel and using matching channel settings. meshunderground |
| Bluetooth won’t connect | Phone pairing bug after flashing | Forget the device in Bluetooth settings, restart both devices, and pair again. meshunderground |
| Firmware update fails | Bad cable, unstable power, or wrong flashing mode | Use a data-capable cable, stable power, and the correct flashing method for your board. YouTube |
| Device behaves oddly after update | Old settings conflict with new firmware | Do a clean reflash or factory reset, then reconfigure from scratch. meshunderground+1 |
| Range is very poor | Antenna not connected, bad antenna, or terrain blockage | Attach the antenna first, raise the node, and test different placement. meshtastic+1 |
| Time is wrong | Timezone not set correctly | Set the correct timezone in POSIX format and reboot the device. Solving Incorrect Time |
First checks
Start with the simplest fixes: verify the antenna is attached, confirm the region is correct for your country, and make sure the node is using the same channel as the other device. Meshtastic’s official guidance also recommends keeping your role simple unless you have a specific reason to change it, because unusual roles can create network problems.
Bluetooth and app issues
If the app will not connect after a fresh flash, remove the old Bluetooth pairing and pair again. On phones, Bluetooth permissions and location permissions can also affect how the app behaves, especially on mobile systems that restrict background access.
Range and mesh issues
If messages work only at very short distance, focus on RF basics first. Check antenna connection, antenna quality, device height, and whether buildings or trees are blocking the path; terrain and placement often matter more than the radio itself.
Firmware problems
When firmware flashing fails or the device becomes unstable after an update, use the official flashing path for that hardware family and consider a clean install. Some reports also show that version mismatches can break messaging until all devices are brought onto compatible firmware and app versions.
WATCH: Meshtastic Firmware Issues – YouTube
Stable default setup
For most beginners, the safest setup is to leave the role at a basic client mode, use the default LongFast-style starting point where appropriate, and avoid changing advanced options until the node is working reliably. Meshtastic’s docs specifically warn that unnecessary router or repeater roles can cause collisions and reduce message reliability.
Useful references
- Official configuration tips: https://meshtastic.org/docs/configuration/tips/meshtastic
- Getting started guide: https://meshtastic.org/docs/getting-started/meshtastic
- Troubleshooting article: https://meshunderground.com/posts/1741044732688-meshtastic-troubleshooting—reliable-off-grid-communication/meshunderground
- Beginner setup video: https://www.youtube.com/watch?v=smQALUBiJ8s youtube
- Flashing guide: https://www.youtube.com/watch?v=HzddKyepqxA youtube
- Official channel configuration: https://meshtastic.org/docs/configuration/radio/channels/meshtastic
- Official encryption guide: https://meshtastic.org/docs/overview/encryption/meshtastic
- Configuration tips: https://meshtastic.org/docs/configuration/tips/meshtastic
- Video on private channels: https://www.youtube.com/watch?v=egAZP4KKHNo youtube
- Video on adding channels: https://www.youtube.com/watch?v=0ZYASBAHMgA youtube
Meshtastic channels are mostly about grouping messages and choosing who can read them, while encryption is controlled by the channel’s PSK. For private use, the important rule is simple: all devices that should talk on the same channel must use the same channel name and the same PSK, and the default primary channel is not truly private because it uses a known key.
How channels work
Each channel has its own settings, including name, PSK, uplink/downlink, mute, and optional location-related options. The channel name must match on devices that need to communicate, and the PSK must also match for encrypted communication.
Meshtastic also notes that the primary channel determines the LoRa frequency slot through a hash of the primary channel name, so two devices with different primary names may not actually transmit on the same slot unless you explicitly set the frequency slot.
How encryption works
Meshtastic uses AES-256-CTR for packet payload encryption on LoRa. The packet header stays unencrypted so nodes can relay traffic even if they cannot decrypt it.
The default primary channel uses a simple known key, so it is fine for testing but not for private communications. For real privacy, you should generate a random 256-bit key and share it only with trusted nodes.
Recommended setup
For a private group, create or edit a channel, set a clear channel name, choose random for the PSK, and make sure every participating node uses the exact same settings. For public or test networks, the default key can work, but anyone else using the same default can join or listen.
If you want a private channel in practice, avoid using the default weak key for sensitive traffic, and do not put private PSKs on unattended router nodes because physical access could expose the key.
Step-by-step
- Open the Meshtastic app or web client and go to Channel settings.
- Edit the primary channel or add a secondary channel.
- Set the channel name for all devices that need to share that channel.
- Choose the PSK type, preferably
randomfor private use. - Save the settings and sync them to each device.
- Confirm both devices are on the same channel before testing a message.
Good practices
Keep one channel for your main group and only add secondary channels if you truly need separate groups or permissions. If you use MQTT or internet gateways, review uplink and downlink settings carefully so you do not expose traffic unintentionally.
If you are troubleshooting, start by checking the channel name, PSK, and primary channel frequency slot before assuming the radio itself is broken.
Helpful references
- Official channel configuration: https://meshtastic.org/docs/configuration/radio/channels/
- Official encryption guide: https://meshtastic.org/docs/overview/encryption/
- Configuration tips: https://meshtastic.org/docs/configuration/tips/
- Video on private channels: https://www.youtube.com/watch?v=egAZP4KKHNo
- Video on adding channels: https://www.youtube.com/watch?v=0ZYASBAHMgA
Official articles
- Meshtastic Getting Started: https://meshtastic.org/docs/getting-started/meshtastic
- Meshtastic Introduction: https://meshtastic.org/docs/introduction/meshtastic
- Meshtastic UI docs: https://meshtastic.org/docs/configuration/device-uis/meshtasticui/meshtastic
Helpful articles
- Basic guide by Mike Oplinger: https://mikeoplinger.com/a-basic-guide-to-meshtastic/mikeoplinger
- Getting Started with Meshtastic by Jeff Geerling: https://www.jeffgeerling.com/blog/2024/getting-started-meshtastic/jeffgeerling
- Meshtastic node deployment guide: https://www.seeedstudio.com/blog/2026/03/17/meshtastic-node-guide/seeedstudio
Instructional videos
- Beginner’s Guide to Meshtastic: https://www.youtube.com/watch?v=abmuu6znG1M youtube
- Getting Started with Meshtastic: Flashing & Configuration: https://www.youtube.com/watch?v=HzddKyepqxA youtube
- Meshtastic Web Flasher Guide: https://www.youtube.com/watch?v=WYhKoSSUeR4 youtube
- Meshtastic Beginners Guide: https://www.youtube.com/watch?v=CZMHWFDZ77Y youtube
- Beginner Meshtastic Buyer’s Guide: https://www.youtube.com/watch?v=KxnDmiB4Dhs youtube
🛠 MQTT Meshtastic
Meshtastic MQTT integration with channels
Meshtastic MQTT works as a bridge between your LoRa mesh and an internet MQTT broker, and channel settings decide which traffic gets forwarded. In practice, you enable MQTT on the device, then turn on uplink and/or downlink only for the channel you want to bridge.
MQTT How it works
When MQTT is enabled, the node publishes mesh packets to the broker and can also accept broker messages back into the mesh. Meshtastic’s docs say the gateway node uplinks and/or downlinks raw MeshPackets, and channel settings control whether a given channel participates.
MQTT Channel settings
Each channel has its own uplink and downlink toggles, so MQTT is not automatically shared across every channel on the radio. The official docs also note that most users only need a single primary channel, and that uplink/downlink should be enabled deliberately for the channels you actually want to bridge.
A common pattern is:
- Keep your normal private chat channel separate.
- Create a dedicated MQTT channel if you want internet bridging.
- Enable uplink/downlink only on that channel.
MQTT Topic and naming
Meshtastic MQTT topics include the region, packet type, and channel name, such as msh/REGION/2/e/CHANNELNAME/USERID. The channel name matters, because the broker topic reflects it and matching channel names are required for communication on the same channel.
MQTT Privacy
Private channels can still be carried over MQTT without exposing the plaintext if they use encryption correctly. Meshtastic’s encryption docs explain that the payload is encrypted, while the packet header remains visible so routers and brokers can forward traffic.
That means MQTT can extend range without automatically making a private channel public, but you should still be careful about which channels you bridge and which broker you use.
MQTT Best setup
For most users, the cleanest setup is:
- Configure MQTT on one gateway node.
- Enable uplink/downlink on one dedicated channel.
- Keep your sensitive group traffic on a separate encrypted channel.
- Test with a short message before expanding the setup.
MQTT Useful references
A step-by-step MQTT setup guide or a diagram showing how channels, MQTT, and the mesh fit together.
Here’s a simple step-by-step MQTT setup guide for Meshtastic, plus a quick diagram of how channels, MQTT, and the mesh fit together. MQTT is enabled on a gateway node, then turned on per channel using uplink/downlink settings.meshtastic+1
Step-by-step setup
- Pair your phone or computer with the Meshtastic node you want to use as the gateway. youtube | rakwireless
- Open the node’s configuration and go to the MQTT module settings. rakwireless | youtube
- Enable MQTT. If you are using the public Meshtastic broker, the default broker settings may already be filled in.nodakmesh+1
- If you are using your own broker, enter the broker address, username, and password.meshtastic+1
- Go to Channels and choose which channel should be bridged. MQTT is configured per channel, not globally across every channel on the radio.meshtastic+1
- Turn on uplink for the channel if you want messages from your mesh to go out to MQTT.nodakmesh+1
- Turn on downlink for the channel if you want messages from MQTT to come back into your local mesh.meshtastic+1
- Save the settings and test with a short message. youtube | rakwireless
Recommended channel layout
A clean setup is to keep one normal encrypted local channel and one dedicated MQTT channel. That way, your private mesh traffic stays separate from the internet bridge, and you can control exactly what gets published or received.meshtastic+1
MQTT How it fits together
text[Meshtastic node]
      |
      |  LoRa mesh packets
      v
[Local mesh channel] <---- uplink / downlink ----> [MQTT broker] <----> [Other MQTT-connected nodes]
MQTT does not replace the mesh; it extends it. The node still works as a normal Meshtastic radio, but MQTT lets selected channel traffic move through an internet broker.hackers-arise+1
MQTT Important settings
- Uplink sends mesh packets to the broker.meshtastic+1
- Downlink brings broker traffic back into the mesh.meshtastic+1
- Channel name matters because MQTT topics reflect the channel structure.meshtastic+1
- If you want privacy, keep sensitive traffic on a separate encrypted channel and only bridge the channel you intend to expose.meshtastic+1
MQTT Good starting approach
If you are new to MQTT, start with one gateway node, one MQTT-enabled channel, and a simple test message. After that works, you can decide whether to add more channels or move to a self-hosted broker.rakwireless+1
Helpful references
- Meshtastic MQTT overview:meshtastic
- MQTT module configuration:meshtastic
- Channel configuration:meshtastic
- Encryption overview:meshtastic
- MQTT setup video:youtube
- Gateway setup guide:rakwireless
Self-hosted MQTT broker setup for Meshtastic
A self-hosted MQTT broker for Meshtastic is the right choice when you want more control, better privacy, and fewer dependency issues than the public broker. The cleanest setup is to run a broker like Mosquitto, point one Meshtastic gateway node to it, and enable MQTT only on the channel you want to bridge.meshtastic+2
MQTT Recommended architecture
Use one broker on a server, Raspberry Pi, or VPS, then connect one or more Meshtastic gateway nodes to that broker over Wi‑Fi or Ethernet-backed internet. Keep your private mesh channel separate from any MQTT-bridged channel so you control exactly what leaves the local mesh.phillymesh+1
textMeshtastic nodes -> local LoRa mesh -> gateway node -> self-hosted MQTT broker -> apps / dashboards / other services
MQTT Broker setup
Install a standard MQTT broker such as Mosquitto, create a username and password, and keep anonymous access disabled. If you want remote access, enable TLS on port 8883 rather than leaving the broker open on plain 1883.nodakmesh+1
A practical broker config for Meshtastic usually includes:
- A listener on 1883 for basic testing or 8883 for TLS.
- Authentication with a password file.
- Persistence enabled so messages and subscriptions survive reboots.
- Optional WebSockets if you want browser-based clients.reddit+1
MQTT Meshtastic device settings
On the Meshtastic node, set the broker address to your server IP or hostname, then enter the MQTT username and password if your broker requires them. Meshtastic’s docs say these are the core fields: mqtt.address, mqtt.username, and mqtt.password. meshtastic
Then decide per channel whether to enable uplink and downlink. Uplink sends mesh packets to the broker, while downlink allows broker traffic back into the mesh, and those settings are controlled on the channel itself.meshtastic+1
MQTT Privacy and encryption
For private traffic, use a private channel with a custom PSK and do not rely on the default channel key. Meshtastic’s MQTT docs warn that the default key is not recommended for private brokers, and the MQTT module also has an encryption setting that controls whether packets sent to the broker are encrypted or unencrypted.meshtastic+1
If you want the broker to handle only private traffic, keep the bridge limited to your dedicated channel and avoid exposing that channel broadly. That reduces the chance of flooding and keeps the public mesh separate from your internal traffic.meshtastic
MQTT Minimal working setup
A simple first deployment looks like this:
- One gateway node with Wi‑Fi enabled.
- One self-hosted broker with a username and password.
- One dedicated MQTT-enabled channel.
- Uplink on, downlink only if you really need two-way bridging.nodakmesh+1
That setup is enough to verify traffic flow before you add dashboards, automation, or multiple nodes.hamradiotherapy+1
MQTT Common mistakes
The most common mistakes are using the wrong broker address, forgetting to enable MQTT on the device, enabling MQTT on the wrong channel, or leaving the broker unsecured. Another frequent issue is enabling MQTT but forgetting that channel uplink/downlink are separate controls.nodakmesh+2
MQTT Example next step
If your goal is a working home setup, the best path is: install Mosquitto, create credentials, turn on MQTT in Meshtastic, set the broker address, then enable uplink on a dedicated channel and test with a short message. That gives you a reliable private bridge without opening your whole mesh to the internet.meshtastic+2
MQTT Helpful references
- Meshtastic MQTT overview:meshtastic
- MQTT module configuration:meshtastic
- Meshtastic MQTT setup guide:nodakmesh
- Self-hosted bridge example:phillymesh
- MQTT broker installation example:reddit
MQTT Troubleshoot Meshtastic MQTT connection failures
MQTT connection failures in Meshtastic usually come from the broker settings, bad credentials, TLS/memory issues, or Wi‑Fi instability on the node. The fastest fix is to verify the broker address, username/password, and whether MQTT is enabled on the correct channel, then test with a simple non-TLS connection before adding security.
MQTT Most common causes
- Wrong broker address or port. A typo, wrong hostname, or wrong port will prevent the node from connecting.
- Bad credentials. One reported case involved a blank character accidentally added to the MQTT username, which caused authentication failures even though the credentials looked correct.
- TLS problems on smaller ESP32-based boards. TLS can fail with memory allocation errors, so plain MQTT is often easier to test first.
- Wi‑Fi instability. Some nodes drop Wi‑Fi when MQTT repeatedly fails to connect, especially if DNS or broker reachability is flaky.
- Channel setup mismatch. MQTT is controlled per channel, so the wrong channel settings can make it look like MQTT is broken when the broker is actually fine.
MQTT Fix checklist
- Confirm the broker hostname, IP, and port are correct.
- Re-enter the MQTT username and password carefully, with no extra spaces.
- Test without TLS first, then add TLS only after the basic connection works.
- Make sure MQTT is enabled in the Meshtastic MQTT module and that the intended channel has uplink/downlink set correctly.
- Reboot the node after changing settings and verify it saved the config.
- Check whether the node stays connected to Wi‑Fi long enough for MQTT to establish.
MQTT If it connects but still fails
If the broker accepts the login but Meshtastic still shows no traffic, the problem is often at the channel level rather than the broker level. Verify that the channel name, PSK, and uplink/downlink choices match the way you want the mesh to bridge.
MQTT Best troubleshooting order
Start simple: local Wi‑Fi, plain MQTT, one channel, known-good credentials, and a small test message. Once that works, add TLS, then more channels, then automation or dashboards.
MQTT More Useful references
- Meshtastic MQTT overview:
- MQTT module configuration:
- Connection failure example with bad username spacing:
- TLS failure example on ESP32:
- Wi‑Fi instability discussion:
Meshastic Community Tutorial Resources
Iowa Mesh | ChicagoLandMesh | NC Mesh | WPAmesh | NoCo Mesh | Colorado Mesh | Bay Area Group | Cascadia Mesh | Louisiana Mesh | Kansas City Meshtastic | Jax Mesh | Florida Mesh |
MeshCore Community Tutorial Resources
WNY MeshCore Guides | NashMesh | TennMesh | RDUmesh | | Gulf Coast Mesh | Bay Area MeshCore | CascadiaMesh |
Suggest additional Mesh Community Tutorial Resource directory links: Mesh101 Recommendations
More Helpful Meshtastic How To Videos
About Meshtastic: Video 1 | Video 2 | Video 3
Download Meshstatic App: Google Play | Apple Store | F-Droid | Others Apps
About MeshCore: Download MeshCore App:
Meshtastic®
START HERE
🛈 Information Rated E for Everyone
🛠 Advanced, Nuts & Bolts, DIY, Nerd Alert
🛈 All You Need To Know About Meshtastic – Seeed Studio <link>
Abstract: “In a simpler way, Meshtastic is a free and easy-to-use tool that lets you send messages without internet or mobile networks. It connects small, specialized devices to create a network where you can communicate over long distances…” <link>

🛠 Meshtastic Maps – Off-Grid – MeshUnderground <link>
Abstract: “Want to see who’s nearby on your Meshtastic mesh network? This guide dives deep into Meshtastic maps, exploring their functionality, benefits, and how they enhance off-grid communication. Whether you’re a seasoned user or just starting, understanding Meshtastic maps is crucial for maximizing your network’s potential…” <link>

🛠 Interactive Mesh Maps List – MeshMap.me Directory <link>
Abstract: “A list of interactive maps and range maps created by leading mesh developers and enthusiasts. Some maps include location, hardware, short name, long name, node number, device role, etc, while others include RF line-of-sight range tools…” <link>
🛈 What Is The MeshMap.Me Directory?
Abstract: “A place where you can list your node and/or a network of nodes in your community, either public or private (login required) to be shared and saved off-line for off-grid/grid-down use. The directory includes a list of mesh tutorials, active mesh maps, and classified ads with links to complete, turn-key finished devices & products (no DIY required). The directory also include blogs and news links.
GUIDES – 🛈 Setup Devices
🛈 Easy setup Meshtastic – (link)
🛈 WisMesh Tag; how to get started – (link)
TUTORIALS – 🛠 Advanced Meshtastic Configurations
🛠 How to Set Up Private Meshtastic Channels The Right Way by Atlavox – (video)
🛠 Advanced Configuration Series – (video)
MENU+: Mesh101 | Interactive Maps | Range Maps | Meshtastic Nodes & Networks | MeshCore Nodes & Networks | Reticulum Nodes & Networks | Blog | more |